Sometimes we like to have an infinite scrollling background. These
look cool. And they are easy to create, if you know all the tricks
(download the FLA).
So here are the tricks ... er, steps:
Create the image and make it exactly as wide as your Stage.
In this case, the image is just a bunch of white dots. The Stage
is 330
pixels wide and so is the graphic symbol.
Convert your image into a graphic symbol (F8) -- in this case,
I named it Starfield.
Now convert it again, but this time into a movie clip symbol (F8).
I named mine Moving Starfield. The movie clip contains the graphic.
Go into Symbol Editing Mode to see the movie clip symbol timeline.
Make sure the graphic symbol is positioned at exactly 0, 0. (Look
at the X, Y coordinates down in the Properties panel.)
Make a new layer in the timeline (you are still inside the movie
clip).
Drag a new instance of the same graphic (e.g. Starfield) out
of the Library and drop it on the Stage, in the new layer.
Position the new instance at the negative of whatever its
width is. Mine, for example, is at X: -330.0, Y: 0.0.
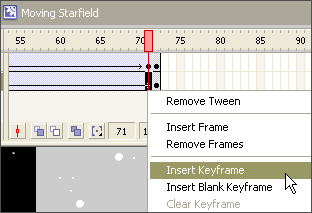
Now you can make the movie clip timeline as long as you want. Put
a keyframe (F6) at the end of each layer. Both layers must be the
same length.
In the keyframes at the END of each layer, move the symbol exactly
the width of itself to the right. That is, my Starfield at X: 0,
Y: 0 moves to X: 330.0, Y: 0.0 -- AND my Starfield at X: -330.0,
Y: 0 moves to X: 0.0, Y: 0.0.
Put a tween on each layer.
Voilà! The main trick is placing two instances of the same
symbol side-by-side and then animating them precisely. If they are
smaller than the viewing area, or if you do not use the 0, 0 coordinates
as instructed, it will not work.
If you followed the instructions, you will see one little hesitation
in the scrolling animation. That is easy to fix. Here's how:
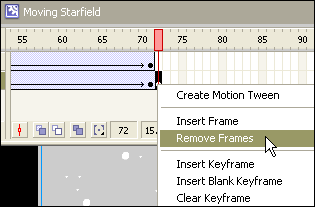
Go to the end of the timeline inside the movie clip. Make a
new keyframe (F6) one frame to the LEFT of the keyframe at the end of each layer.
Then remove the original last keyframe from the end of each layer.
What you're doing is eliminating the frame that is identical to frame
1 in each layer. That is what caused the hesitation.
If you want to know even more about scrolling backgrounds, read
on.